The Desk
When I first got my own furniture, the desk was by far the most important thing (with the accompanying chair a close second). I spend a big chunk of my time (arguably too much) in that space, so it made sense to get it right.
The IKEA Malm desk was a solid choice. Quite literally - it's thick and sturdy, as well as providing a great amount of space, with a 'shrinkable' footprint, useful if required to move it to a smaller space, thanks to the sliding side section. Since I lived first in a studio flat, it was almost the only non-kitchen surface, meaning it was hugely overcrowded with stuff. That is now very much fixed, and three years on, it's pretty much the best desk I could wish for (sapient pearwood notwithstanding).
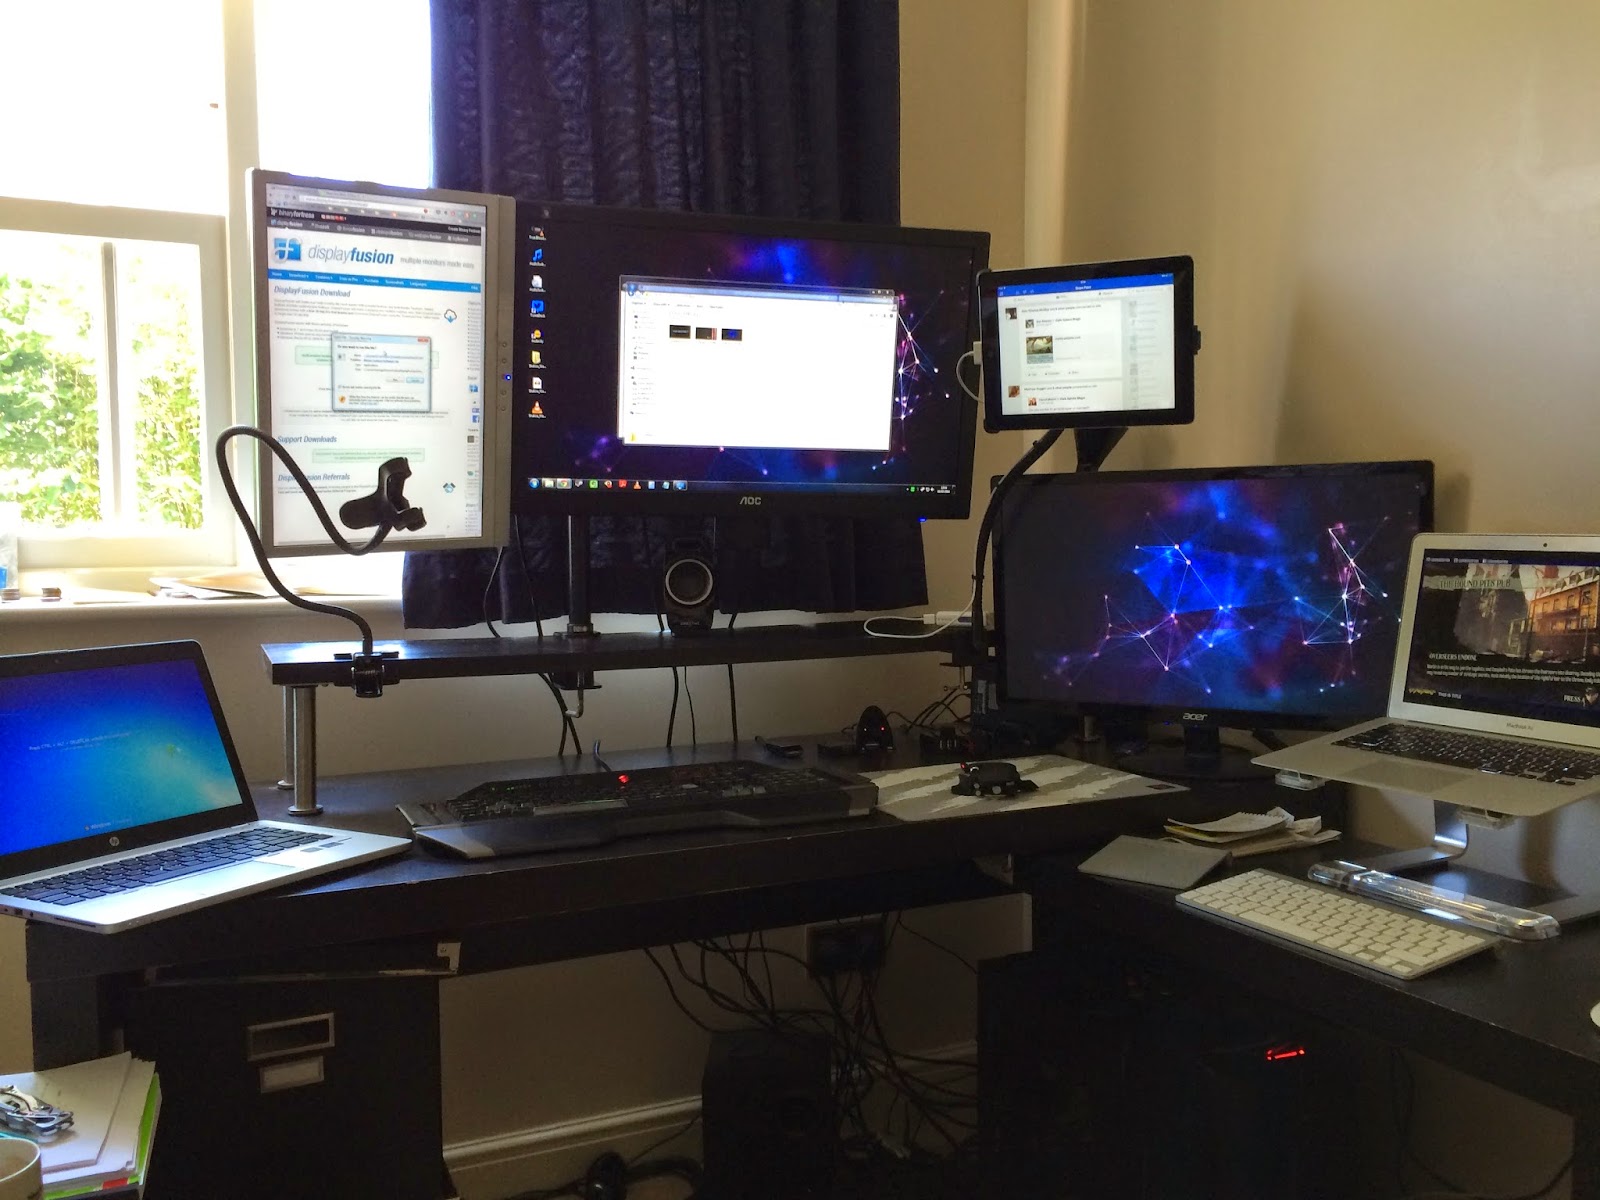 |
| The full ensemble, complete with added work laptop |
The Shelf
'The what?' you say. 'How important is a shelf?'. Well, let me tell you now - adding a raised unit was just about the best 'upgrade' I made to the desk. If you have one or more external monitors, the ability to raise them up clears a surprising amount of room. You can slide keyboards and other stuff under it, giving yourself more space for papers and hand writing as needed. It also enabled some neat stuff that I'm about to mention.

The Laptop Raiser
This is one of those things that definitely fits in the 'not necessary, but surprisingly useful' category. I use a combination of my desktop PC and my MacBook Air (as well as another laptop when working from home). Up to now, I have mixed and matched how I set these up with my external monitors, but the laptop generally sits on the side unit.

Adding a good laptop raiser - the Griffin Elevator raiser - has brought the screen and keyboard to a better height, such that I can turn to it and use it comfortably without having to shoot down on my chair.
There are ancillary benefits, such as better cooling, but these generally don't really factor in 95% of the time.
The Screens
Now we get to the fun stuff. Anyone who knows me may well think I have somewhat of a screen addiction. I'm not going to dispute that, but a good screen setup goes a long way if you're using a computer for any length of time.

I installed a clampstand with articulated arms for my main screen, fixing it to the shelf (as this is where the Malm desk's thickness works against it - you can't clamp things onto the main surface). Annoyingly, my secondary screen turned out not to be mountable, but this has actually worked out better than I thought. I've strapped up my smaller, 19" monitor vertically. This works well as a Twitter feed, Evernote screen, A4 PDF viewer, or even just for showing general widgets. Both it and the main screen are easy to rotate, adjust and move as required. My secondary, 24" screen sits nearer to the laptop stand.
While I'd love to stick more screens in here and have the full three running off each machine, the (probably better) compromise I've come up with is adding an HDMI switcher to the main monitor. This means I can quickly switch whether the macbook or the PC displays there. The PC is my main gaming machine, but I use the Macbook more for writing, so that flexibility is really useful.

Tablet and Phone Clamps
To round it out, we have what's probably my favourite part. If you use a tablet with any frequency, I strongly suggest checking out one of these clamp stands. There will almost certainly be somewhere you could benefit from it, be it at your desk, in the kitchen, even on your bed.

The tablet clips in easily and can be held in just about any position by the gooseneck, while still being easily adjustable and rotatable. Having your tablet just there in front of your face is surprisingly useful. I use it to display my calendar, check social media, email or messages, or just for quickly looking up things while in game. Its default position isn't great for typing on it, but it's easy to adjust or work with voice commands.
The same applies for the phone - it's good as a hands free from taking calls, or just as a FaceTime/Skype camera.

Added bonus - if you take out the tablet and use a bulldog clip, you can hang printed documents from the tablet stand.
The fact that I'm writing this at all probably shows you how obsessive I can be about this sort of thing, but seriously, this feels like a great setup. Not everyone has the space or even the want/need (I'm not sure that I have the need, really) for this sort of setup, but even little things like raised units and tablet stands can make a great deal of difference.
The overall effect is to give a functional yet flexible workspace, where you have access to a good amount of screen real estate (usefully positioned), but still have plenty of workspace to put things (books, reference material, whatever’s your jam (don’t put jam on your desk)) or handwrite or whatever. Proper monitor stands, clamped goosenecks (honk) and raised units can go a long way to ‘creating’ additional space, regardless of what you started with.
As ever, you can question/vent/share thoughts in the comments, and find me on Twitter @mastergeorge.
As ever, you can question/vent/share thoughts in the comments, and find me on Twitter @mastergeorge.
*honk honk*
ReplyDelete